Update to FindFace Multi 2.3
Tip
If you use our product FindFace Security deployed on Ubuntu 18.04, upgrade it to FindFace Multi 1.2 and then update it to FindFace Multi 2.3.
If you use FindFace Multi 2.2.1, update it to FindFace Multi 2.3 by following the instruction.
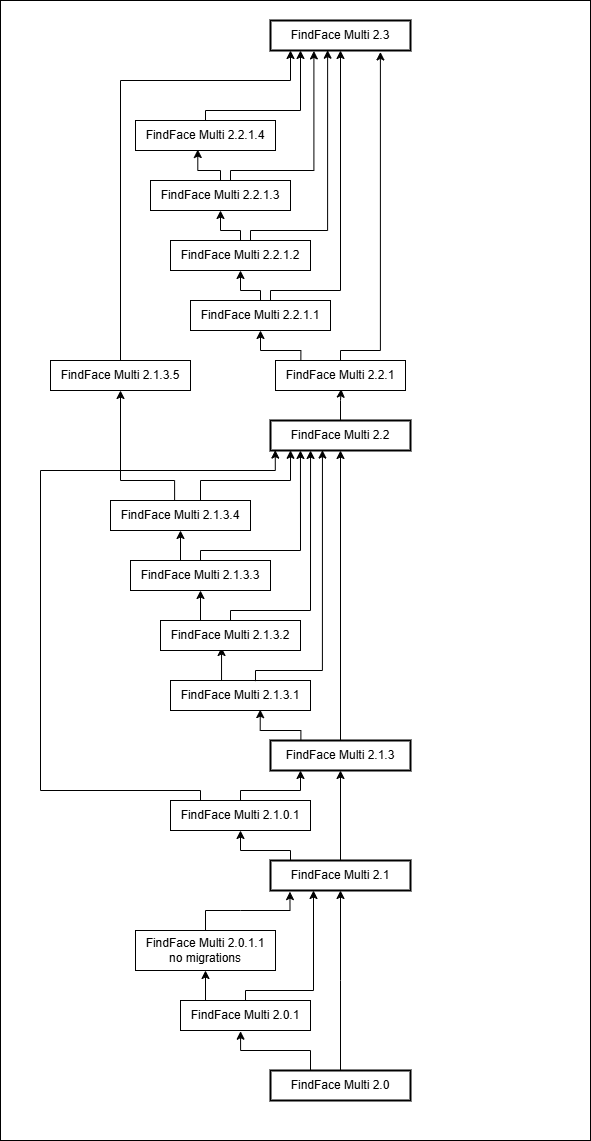
If you use FindFace Multi 2.0+, as well as minor versions below 2.3, please refer the upgrade scheme shown in the figure below.
If FindFace Multi is used as a puppet server for integrating with FindFace CIBR, re-enable and reconfigure the ffsecurity_vns plugin using the updated findface-multi-legacy.py configuration file.
Integration with Axxon Next is included into external VMS integration in FindFace Multi 2.1+ and configured through VMS integration plugin.
In this section:
Update FindFace Multi 1.2 to FindFace Multi 2.3
Important
Before you start the update, disable all cameras.
Note
If you created person and car cards with custom fields in FindFace Multi 1.2 and want them to be displayed in the FindFace Multi 2.3 UI, then it is necessary to copy the CUSTOM_FIELDS section from the old configuration file in step #2 and paste it to the new configuration file in step #8.
To update FindFace Multi 1.2 to FindFace Multi 2.3, do the following:
Create a backup copy of the old schema of the Tarantool-based feature vector database:
sudo cp /etc/findface-security/tnt_schema.lua /etc/findface-security/old_tnt_schema.lua
Starting with version 2.0, one of the most significant differences between FindFace Multi and earlier versions of the product is the structure of the Tarantool biometric database (so called meta-schema). The new structure is created as a set of spaces, while in previous versions of the product there was only one space by default in the structure of the Tarantool-based database.
Open the
/etc/findface-security/config.pyconfiguration file. Save the values of the following parameters for later use:EXTERNAL_ADDRESS,SECRET_KEY,VIDEO_DETECTOR_TOKEN,ROUTER_URL,CUSTOM_FIELDS.sudo vi /etc/findface-security/config.py EXTERNAL_ADDRESS = "http://172.20.77.58" ... # use pwgen -sncy 50 1|tr "'" "." to generate your own unique key SECRET_KEY = 'c8b533847bbf7142102de1349d33a1f6' FFSECURITY = { 'VIDEO_DETECTOR_TOKEN': '381b0f4a20495227d04185ab02f5085f', ... 'ROUTER_URL': 'http://172.20.77.58', ... # -- Custom model fields -- # Edit CUSTOM_FIELDS -> `human_card` section to customize human card fields. # Edit CUSTOM_FIELDS -> `face_object` section to customize face object fields. # Below is an example with every field type possible. # 'CUSTOM_FIELDS': { # 'human_card': { # 'items': [ # { # 'name': 'personid', # 'default': '', # 'label': 'PersonID', # 'display': ['list', 'form'], # 'description': 'Sigur person ID', # 'editable': False # }, # { # 'name': 'firstname', # 'default': '', # 'label': 'First Name', # 'display': ['list', 'form'], # 'description': 'Sigur first name', # 'editable': False # }, # { # 'name': 'lastname', # 'default': '', # 'label': 'Last Name', # 'display': ['list', 'form'], # 'description': 'Sigur last name', # 'editable': False # }, # { # 'name': 'version', # 'default': '', # 'label': 'Version', # 'display': ['list', 'form'], # 'description': 'Sigur photo version', # 'editable': False # } # ], # 'filters': [ # { # 'name': 'personid', # 'label': 'Sigur person ID filter', # 'field': 'personid' # } # ] # }, # 'face_object': { # 'items': [ # { # "field_name": "tag_name_1", # "type": "string", # "default": "change_me" # }, # { # "field_name": "tag_name_2", # "type": "uint", # "default": 123 # }, # { # "field_name": "tag_name_3", # "type": "bool", # "default": True # }, # ] # } # }, }
Stop the
findface-securityservice.sudo systemctl stop findface-security.service
Create a backup of the Tarantool-based feature vector database in any directory of your choice, for example,
/etc/findface_dump.sudo mkdir -p /etc/findface_dump cd /etc/findface_dump sudo findface-storage-api-dump -config /etc/findface-sf-api.ini
Note
If you have enabled a Video Recorder and want to keep existing video recordings in FindFace Multi 2.3, take an additional step. Create a backup copy of MongoDB:
sudo mongodump --out /etc/findface_dump/mongo_dump
To avoid port conflicts, stop and disable all services before installing a new version.
Note
There are eight shards in the example below. If it differs with the number of shards in your system, adjust the below command accordingly. E.g., for the system with sixteen shards, replace
tarantool@shard-00{1..8}.servicewithtarantool@shard-0{01..16}.service. Get the list of active shards with thels /etc/tarantool/instances.enabled/command.You may stop and disable the services one by one:
sudo systemctl stop postgresql.service
sudo systemctl stop postgresql@10-main
sudo systemctl stop findface-*.service
sudo systemctl stop pgbouncer.service
sudo systemctl stop tarantool@shard-00{1..8}.service
sudo systemctl stop nats-server.service
sudo systemctl stop etcd.service
sudo systemctl stop mongod.service
sudo systemctl stop mongodb.service
sudo systemctl stop memcached.service
sudo systemctl stop nginx.service
sudo systemctl stop redis.service

sudo systemctl disable postgresql.service
sudo systemctl disable postgresql@10-main
sudo systemctl disable pgbouncer.service
sudo systemctl disable findface-extraction-api.service
sudo systemctl disable findface-security.service
sudo systemctl disable findface-security-onvif.service
sudo systemctl disable findface-sf-api.service
sudo systemctl disable findface-ntls.service
sudo systemctl disable findface-video-manager.service
sudo systemctl disable findface-video-worker-cpu.service
sudo systemctl disable findface-video-worker-gpu.service
sudo systemctl disable findface-counter.service
sudo systemctl disable findface-liveness-api.service
sudo systemctl disable findface-video-streamer-cpu.service
sudo systemctl disable findface-video-streamer-gpu.service
sudo systemctl disable findface-video-storage.service
sudo systemctl disable tarantool@shard-00{1..8}.service
sudo systemctl disable nats-server.service
sudo systemctl disable etcd.service
sudo systemctl disable mongod.service
sudo systemctl disable mongodb.service
sudo systemctl disable memcached.service
sudo systemctl disable nginx.service
sudo systemctl disable redis.service
Or you may use the following compact commands instead:
sudo systemctl stop postgresql.service postgresql@10-main findface-*.service pgbouncer.service tarantool@shard-00{1..8}.service nats-server.service etcd.service mongod.service mongodb.service memcached.service nginx.service redis.service

sudo systemctl disable postgresql.service postgresql@10-main pgbouncer.service findface-extraction-api.service findface-security.service findface-security-onvif.service findface-sf-api.service findface-ntls.service findface-video-manager.service findface-video-worker-cpu.service findface-video-worker-gpu.service findface-counter.service findface-liveness-api.service findface-video-streamer-cpu.service findface-video-streamer-gpu.service findface-video-storage.service tarantool@shard-00{1..8}.service nats-server.service etcd.service mongod.service mongodb.service memcached.service nginx.service redis.service
Install the FindFace Multi 2.3 instance. Don’t forget to prepare a server first:
See:
After FindFace Multi installation, stop all the containers from the
/opt/findface-multi/directory.cd /opt/findface-multi/ sudo docker-compose stop
Open the
/opt/findface-multi/configs/findface-multi-legacy/findface-multi-legacy.pyconfiguration file and paste saved on step #2 values for the parametersEXTERNAL_ADDRESS,SECRET_KEY,VIDEO_DETECTOR_TOKEN,ROUTER_URL, andCUSTOM_FIELDSinto it.sudo vi /opt/findface-multi/configs/findface-multi-legacy/findface-multi-legacy.py ... # Use pwgen -sncy 50 1|tr "'" "." to generate your own unique key SECRET_KEY = '002231ccb690586f4d33e98322c591bb' ... SERVICE_EXTERNAL_ADDRESS = 'http://172.20.77.58' # EXTERNAL_ADDRESS is used to access objects created inside FFSecurity via external links. EXTERNAL_ADDRESS = 'http://172.20.77.58' ... # findface-video-worker authorization token 'VIDEO_DETECTOR_TOKEN': '8977e1b0067d43f6c908d0bf60363255', ... # findface-video-worker face posting address, # it must be set to either FFSecurity EXTERNAL_ADDRESS (by default) # or findface-facerouter url (in some specific cases) 'ROUTER_URL': 'http://127.0.0.1:80',
If you modified the configuration files of the
findface-extraction-api,findface-ntlsandfindface-sf-apiservices of FindFace Multi 1.2, update the corresponding parameters in the FindFace Multi 2.3 configuration files, such as network settings (ports, URLs, etc.). If the parameter in the previous configuration file of the FindFace Multi 1.2 version was not changed manually by the user, and in the new configuration file of the FindFace Multi 2.3 version has a different value after the update, then it is not recommended to change it manually.sudo vi /etc/findface-ntls.cfg sudo vi /opt/findface-multi/configs/findface-ntls/findface-ntls.yaml sudo vi /etc/findface-extraction-api.ini sudo vi /opt/findface-multi/configs/findface-extraction-api/findface-extraction-api.yaml sudo vi /etc/findface-sf-api.ini sudo vi /opt/findface-multi/configs/findface-sf-api/findface-sf-api.yaml
Important
FindFace Multi 2.3 is not backward compatible with FindFace Multi 1.2 (or earlier) neural network models. Therefore, neural network model names from the configuration file
/etc/findface-extraction-api.inicannot be transferred to the new configuration file/opt/findface-multi/configs/findface-extraction-api/findface-extraction-api.yaml.Modify the Tarantool database structure by applying the
tnt_schema.luaschema from FindFace Multi 2.3.sudo docker run --rm --network host --volume '/opt/findface-multi/configs/findface-multi-legacy/findface-multi-legacy.py:/etc/findface-security/config.py:ro' docker.int.ntl/ntech/multi/multi/legacy:ffmulti-2.3.0 make-tnt-schema | sudo tee /etc/findface-security/tnt_schema.lua
Purge data from all the directories relevant to active shards.
sudo rm /opt/ntech/var/lib/tarantool/shard-*/{index,snapshots,xlogs}/*
Copy the meta-schema of the
defaultspace from theold_tnt_schema.luaconfiguration file to the newtnt_schema.luaconfiguration file, so that the old meta-schema is still available. An easy way to do it is to follow these steps:12.1. In the
/etc/findface-security/old_tnt_schema.luafile, rename the following fields:meta_scheme --> meta_scheme_default meta_indexes --> meta_indexes_default
12.2. In the new configuration file
/etc/findface-security/tnt_schema.lua, replace the following lines at the beginning of the file:cfg_spaces = { default = { meta_scheme = { -- internal.normalized_id: { default = '', field_type = 'string', id = 1, name = 'normalized_id', }, -- internal.feat: { default = '', field_type = 'string', id = 2, name = 'feat', }, }, meta_indexes = {} },
with these ones:
dofile("/etc/findface-security/old_tnt_schema.lua")
spaces = {
 default = {
    meta_scheme=meta_scheme_default,
    meta_indexes=meta_indexes_default
  },
Navigate to the directory with Tarantool configuration file(s)
/etc/tarantool/instances.available/. Import new meta-schematnt_schema.luainto each configuration fileshard-00*.lua, as in the example below.sudo vi /etc/tarantool/instances.available/shard-00*.lua dofile("/etc/findface-security/tnt_schema.lua") FindFace = require("FindFace") FindFace.start("127.0.0.1", 8104, { license_ntls_server="127.0.0.1:3133", replication = replication_master, spaces = spaces })
Remove the default configuration file
FindFace.lua, generated by thefindface-tarantool-serverpackage, as it will block the restart, required on the next step.sudo rm -rf /etc/tarantool/instances*/FindFace.lua
Restart the
findface-tarantool-servershards.TNT=$(ls /etc/tarantool/instances.enabled/ | cut -c 7,8,9) for i in $TNT; do sudo systemctl restart tarantool@shard-$i.service ; done
Upon completion of the above steps, the shards will still keep the old galleries created within the
defaultspace, but new spaces (e.g.,ffsec_body_objects_space,ffsec_face_clusters_space, and so on) will also become available.Restore old data from the backup. The data will be restored as it existed previously: all galleries will stay within the
defaultspace.sudo systemctl start findface-ntls.service cd /etc/findface_dump for x in *.json; do sudo findface-storage-api-restore -config /etc/findface-sf-api.ini < "$x"; done
Open the
/opt/findface-multi/configs/findface-multi-legacy/findface-multi-legacy.pyconfiguration file and set the value of the parameter'SF_API_ADDRESS'to'http://127.0.0.1:18411'temporarily. Revert the parameter to its original value'http://findface-sf-api:18411'in step #19.6:sudo vi /opt/findface-multi/configs/findface-multi-legacy/findface-multi-legacy.py ... 'SF_API_ADDRESS': 'http://127.0.0.1:18411'
Migrate galleries from the
defaultspace to new spaces:sudo systemctl start findface-sf-api.service sudo systemctl start nginx.service sudo docker run --rm --network host --volume '/opt/findface-multi/configs/findface-multi-legacy/findface-multi-legacy.py:/etc/findface-security/config.py:ro' docker.int.ntl/ntech/multi/multi/legacy:ffmulti-2.3.0 /opt/findface-security/bin/python3 /tigre_prototype/manage.py migrate_tnt_space
Perform PostgreSQL database migrations for FindFace Multi 2.3 compatibility. Do the following:
19.1. Navigate to the
/opt/findface-multi/configs/findface-multi-legacy/findface-multi-legacy.pyconfiguration file. In theDATABASES → defaultsection, temporarily replacePASSWORDwith the old one, used in the/etc/findface-security/config.pyconfiguration file. Also replace host and port to'HOST': '127.0.0.1'and'PORT': 5439. Revert these parameters to their original values in step #19.6.Important
Make sure to write down the password from the
/opt/findface-multi/configs/findface-multi-legacy/findface-multi-legacy.pyconfiguration file. You will need it later.sudo vi /opt/findface-multi/configs/findface-multi-legacy/findface-multi-legacy.py DATABASES = { 'default': { 'ENGINE': 'django.db.backends.postgresql', 'DISABLE_SERVER_SIDE_CURSORS': True, 'NAME': 'ffsecurity', 'HOST': '127.0.0.1', 'PORT': 5439, 'USER': 'ntech', 'PASSWORD': 'XXXXXXXXXXXXXXXX' } }
19.2. In the
/etc/pgbouncer/pgbouncer.inifile, add the following line to thedatabasessection:ffsecurity_session = dbname=ffsecurity host=localhost port=5432 user=ntech pool_mode=session pool_size=10
19.3. On the host system, perform the database migration:
sudo systemctl start postgresql.service
sudo systemctl start pgbouncer.service
sudo docker run --rm --network host --volume '/opt/findface-multi/configs/findface-multi-legacy/findface-multi-legacy.py:/etc/findface-security/config.py:ro' docker.int.ntl/ntech/multi/multi/legacy:ffmulti-2.3.0 /opt/findface-security/bin/python3 /tigre_prototype/manage.py migrate
19.4. Back up an existing database with PostgreSQL, installed on the host system.
cd /opt/findface-multi/
sudo -u postgres pg_dump --verbose --disable-triggers ffsecurity | sudo tee dump_ffsecurity.sql
sudo -u postgres pg_dump -t auth_group -t ffsecurity_adgroupguid -t ffsecurity_deviceblacklistrecord -t ffsecurity_ffsecauthsession -t ffsecurity_grouppermission -t ffsecurity_runtimesetting -t ffsecurity_user -t ffsecurity_user_groups -t ffsecurity_user_user_permissions -t ffsecurity_userkeyvalue -t knox_authtoken -t ffsecurity_watchlistpermission -t ffsecurity_cameragrouppermission --data-only --verbose --no-acl --no-owner --disable-triggers ffsecurity | sudo tee dump_identity_provider.sql
Additionally, copy permission configuration for camera groups and watch lists.
sudo -u postgres psql -d ffsecurity -c "\copy (SELECT id, created_date, modified_date, name, created_by FROM ffsecurity_watchlist) TO stdout WITH CSV HEADER" | sudo tee ffsecurity_watchlist_data.csv
sudo -u postgres psql -d ffsecurity -c "\copy (SELECT id, created_date, modified_date, name, created_by FROM ffsecurity_cameragroup) TO stdout WITH CSV HEADER" | sudo tee ffsecurity_cameragroup_data.csv
19.5. Back up role permissions.
sudo docker run --rm --network host --volume '/opt/findface-multi/configs/findface-multi-legacy/findface-multi-legacy.py:/etc/findface-security/config.py:ro' docker.int.ntl/ntech/multi/multi/legacy:ffmulti-2.3.0 /opt/findface-security/bin/python3 /tigre_prototype/manage.py dump_permissions | sudo tee permissions.csv
19.6. Change back the password, replaced in step #19.1. Also revert host and port values in
DATABASES → defaultsection to their original values:'HOST': 'pgbouncer','PORT': 6432. Revert the'SF_API_ADDRESS'parameter to its original value'http://findface-sf-api:18411', replaced in step #17:19.7. Stop all the services.
sudo systemctl stop findface-sf-api.service nginx.service tarantool@shard-00{1..8}.service postgresql.service pgbouncer.service findface-ntls.service
19.8. Open the
/opt/findface-multi/docker-compose.yamlfile and copy a{NEW_POSTGRES_PASSWORD}value to use it in further commands.grep postgresql\: docker-compose.yaml -A5 | grep POSTGRES_PASSWORD environment: {POSTGRESQL_ALLOW_REMOTE_CONNECTIONS: 'no', POSTGRES_PASSWORD: {NEW_POSTGRES_PASSWORD}}
19.9. Remove PostgreSQL data. Then, start PostgreSQL by starting the containers and recreate all existing databases.
sudo rm -rf data/postgresql
sudo docker-compose up -d --force-recreate postgresql
19.10. Restore data into the recreated
ffsecuritydatabase. Paste{NEW_POSTGRES_PASSWORD}value that you previously copied in step #19.8 into the command below:sudo docker exec -i findface-multi-postgresql-1 /bin/bash -c "PGPASSWORD={NEW_POSTGRES_PASSWORD} psql --username postgres ffsecurity" < dump_ffsecurity.sql
19.11. Run migration.
sudo docker-compose up -d pgbouncer
sudo docker run --rm --network multi-network --volume '/opt/findface-multi/configs/findface-multi-identity-provider/findface-multi-identity-provider.py:/etc/findface-security/config.py:ro' docker.int.ntl/ntech/multi/multi/identity-provider:ffmulti-2.3.0 /opt/findface-security/bin/python3 /tigre_prototype/manage.py migrate
19.12. Restore camera group and watch list permissions. Paste
{NEW_POSTGRES_PASSWORD}value that you previously copied in step #19.8 into the command below:cat ffsecurity_watchlist_data.csv | docker-compose exec -i -T -e PGPASSWORD={NEW_POSTGRES_PASSWORD} postgresql psql -U postgres -d ffsecurity_identity_provider -c "\copy ffsecurity_watchlist FROM stdin WITH CSV HEADER" cat ffsecurity_cameragroup_data.csv | docker-compose exec -i -T -e PGPASSWORD={NEW_POSTGRES_PASSWORD} postgresql psql -U postgres -d ffsecurity_identity_provider -c "\copy ffsecurity_cameragroup FROM stdin WITH CSV HEADER"
19.13. Restore data into the recreated
ffsecurity_identity_providerdatabase. Paste{NEW_POSTGRES_PASSWORD}value that you previously copied in step #19.8 into the command below:sudo docker exec -i findface-multi-postgresql-1 /bin/bash -c "PGPASSWORD={NEW_POSTGRES_PASSWORD} psql --username postgres ffsecurity_identity_provider" < dump_identity_provider.sql
19.14. Start all the services.
sudo docker-compose up -d
19.15. Run these commands to create records in the outbox table for watch lists and camera groups.
sudo docker run --rm --network multi-network --volume '/opt/findface-multi/configs/findface-multi-legacy/findface-multi-legacy.py:/etc/findface-security/config.py:ro' docker.int.ntl/ntech/multi/multi/legacy:ffmulti-2.3.0 /opt/findface-security/bin/python3 /tigre_prototype/manage.py export_to_outbox --watchlists
sudo docker run --rm --network multi-network --volume '/opt/findface-multi/configs/findface-multi-legacy/findface-multi-legacy.py:/etc/findface-security/config.py:ro' docker.int.ntl/ntech/multi/multi/legacy:ffmulti-2.3.0 /opt/findface-security/bin/python3 /tigre_prototype/manage.py export_to_outbox --cameragroups
19.16. Before you restore role permissions into the
identity_providerservice, examine the/opt/findface-multi/permissions.csvfile. Make sure to replace*_ffsecauthtokenwith*_authtokenif any. This is mostly applicable to those cases when FindFace Multi 1.2 installation was an upgrade from earlier versions of the product.After that, restore role permissions into the
identity_providerservice.sudo docker run --rm --network multi-network -v /opt/findface-multi/configs/findface-multi-identity-provider/findface-multi-identity-provider.py:/etc/findface-security/config.py:ro -v $(pwd)/permissions.csv:/var/permissions.csv:ro docker.int.ntl/ntech/multi/multi/identity-provider:ffmulti-2.3.0 /opt/findface-security/bin/python3 /tigre_prototype/manage.py load_permissions /var/permissions.csv
19.17. Copy full frame photos, normalized images, and the license file. Copy files from the
/opt/ntech/license/folder into the/opt/findface-multi/data/findface-ntls/folder, from the/var/lib/findface-security/uploads/folder into the/opt/findface-multi/data/findface-multi-legacy/uploads/folder, from the/var/lib/ffupload/uploads/folder into the/opt/findface-multi/data/findface-upload/uploads/folder.sudo cp -r /opt/ntech/license/* /opt/findface-multi/data/findface-ntls/ sudo cp -r /var/lib/findface-security/uploads/* /opt/findface-multi/data/findface-multi-legacy/uploads/ sudo cp -r /var/lib/ffupload/uploads/* /opt/findface-multi/data/findface-upload/uploads/ sudo chmod 777 -R /opt/findface-multi/data/findface-upload/uploads/ sudo chown www-data:www-data -R /opt/findface-multi/data/findface-upload/uploads/*
19.18. To move Tarantool data, do the following:
Stop all FindFace Multi containers:
sudo docker-compose down
Start the old shards and the
findface-sf-apiservice again:sudo systemctl start tarantool@shard-00{1..8}.service findface-sf-api.service
Create a new backup of the feature vector database:
sudo mkdir -p /etc/findface_dump_final
sudo findface-storage-api-dump -output-dir=/etc/findface_dump_final -config /etc/findface-sf-api.ini
Mount
/etc/findface_dump_finalinto volumes offindface-sf-apiservice:sudo vi /opt/findface-multi/docker-compose.yaml ... findface-sf-api: command: [--config=/etc/findface-sf-api.yml] depends_on: [memcached] image: docker.int.ntl/ntech/universe/sf-api:ffserver-12.241211.2 logging: {driver: journald} networks: [product-network] restart: always volumes: ['./configs/findface-sf-api/findface-sf-api.yaml:/etc/findface-sf-api.yml:ro', '/etc/findface_dump_final:/etc/findface_dump_final']
Stop the rest of the services, clear the
instances.enableddirectory, start the containers again, and perform the storage-api-restore operation:sudo systemctl stop tarantool@shard-00{1..8}.service findface-sf-api.service findface-ntls.service sudo rm /etc/tarantool/instances.enabled/* sudo docker-compose up -d sudo docker exec -it findface-multi-findface-sf-api-1 /bin/bash -c "/storage-api-restore -config /etc/findface-sf-api.yml /etc/findface_dump_final/*.json"
Note
If you have created a backup of MongoDB on step 4 to keep video recordings of a Video Recorder, take this additional step. Move a MongoDB backup copy to the /opt/findface-multi/data/mongodb directory and restore MongoDB data. Do the following:
sudo cp -r /etc/findface_dump/mongo_dump/ /opt/findface-multi/data/mongodb
sudo chown mongodb:mongodb -R /opt/findface-multi/data/mongodb/mongo_dump/*
sudo docker exec findface-multi-mongodb-1 mongorestore data/db/mongo_dump
The update has been completed, but the new version includes new neural network models, so it is also necessary to migrate feature vectors to a different neural network model.
Important
We highly recommend disabling the Ubuntu automatic update to preserve the FindFace Multi compatibility with the installation environment. In this case, you will be able to update your OS manually, fully controlling which packages to update.
To disable the Ubuntu automatic update, execute the following commands:
sudo apt-get remove unattended-upgrades
sudo systemctl stop apt-daily.timer
sudo systemctl disable apt-daily.timer
sudo systemctl disable apt-daily.service
sudo systemctl daemon-reload
Update FindFace Multi 2.2.1 to FindFace Multi 2.3
To update FindFace Multi 2.2.1 to FindFace Multi 2.3, do the following:
In a user home directory, create a folder for FindFace Multi 2.2.1 backup data.
mkdir ~/backup_data/
Back up FindFace Multi configuration files and the
docker-compose.yamlfile and switch to the/opt/findface-multi/directory.sudo cp -r /opt/findface-multi/configs/ ~/backup_data/configs/ sudo cp /opt/findface-multi/docker-compose.yaml ~/backup_data/ cd /opt/findface-multi/
Back up PostgreSQL data.
From the
/opt/findface-multi/docker-compose.yamlfile copy{POSTGRES_PASSWORD}value for use in subsequent commands.grep postgresql\: docker-compose.yaml -A5 | grep POSTGRES_PASSWORD environment: {POSTGRES_PASSWORD: {POSTGRES_PASSWORD}}
Create a folder for PostgreSQL backup data.
mkdir ~/backup_data/pg_bkp
Create backups of
legacy.sqlandidentity_provider.sql, and paste the{POSTGRES_PASSWORD}value you copied earlier. If you have configured Alerts and BI Analytics, also create annex database backups (superset.sqlandalerts.sql).sudo docker exec -i findface-multi-postgresql-1 /bin/bash -c "PGPASSWORD={POSTGRES_PASSWORD} pg_dump --username postgres ffsecurity" > ~/backup_data/pg_bkp/legacy.sql sudo docker exec -i findface-multi-postgresql-1 /bin/bash -c "PGPASSWORD={POSTGRES_PASSWORD} pg_dump --username postgres ffsecurity_identity_provider" > ~/backup_data/pg_bkp/identity_provider.sql sudo docker exec -i findface-multi-postgresql-1 /bin/bash -c "PGPASSWORD={POSTGRES_PASSWORD} pg_dump --username postgres superset" > ~/backup_data/pg_bkp/superset.sql sudo docker exec -i findface-multi-postgresql-1 /bin/bash -c "PGPASSWORD={POSTGRES_PASSWORD} pg_dump --username postgres alerts" > ~/backup_data/pg_bkp/alerts.sql
If you have configured Alerts and BI Analytics, back up TimescaleDB data.
From the
/opt/findface-multi/docker-compose.yamlfile copy{TIMESCALEDB_PASSWORD}value for use in subsequent commands.grep timescaledb\: docker-compose.yaml -A5 | grep POSTGRES_PASSWORD environment: {PGPORT: 5433, POSTGRESQL_ALLOW_REMOTE_CONNECTIONS: 'yes', POSTGRES_PASSWORD: {TIMESCALEDB_PASSWORD}}
Create a folder for TimescaleDB backup data.
mkdir ~/backup_data/tdb_bkp
Create backups of
annex.sqlandanalytics.sql, and paste the{TIMESCALEDB_PASSWORD}value you copied earlier.sudo docker exec -i findface-multi-timescaledb-1 /bin/bash -c "PGPASSWORD={TIMESCALEDB_PASSWORD} pg_dump --username postgres annex" > ~/backup_data/tdb_bkp/annex.sql sudo docker exec -i findface-multi-timescaledb-1 /bin/bash -c "PGPASSWORD={TIMESCALEDB_PASSWORD} pg_dump --username postgres analytics" > ~/backup_data/tdb_bkp/analytics.sql
Back up Tarantool data.
sudo docker exec -it findface-multi-findface-sf-api-1 bash -c "mkdir ffmulti_dump; cd ffmulti_dump && /storage-api-dump -config /etc/findface-sf-api.ini"
sudo docker cp findface-multi-findface-sf-api-1:/ffmulti_dump ~/backup_data/
List the content of the
backup_data/folder, located in a user home directory. It will look like this:ls ~/backup_data/ configs docker-compose.yaml ffmulti_dump pg_bkp tdb_bkp
List also the content of the
pg_bkpandtdb_bkpdirectories. It will look like this:ls ~/backup_data/pg_bkp/ alerts.sql identity_provider.sql legacy.sql superset.sql ls ~/backup_data/tdb_bkp/ analytics.sql annex.sql
Stop all FindFace Multi containers.
sudo docker-compose down
Remove the
/opt/findface-multi/data/findface-tarantool-server/,/opt/findface-multi/data/postgresql/and/opt/findface-multi/data/timescaledb/folders.sudo rm -r /opt/findface-multi/data/findface-tarantool-server/ sudo rm -r /opt/findface-multi/data/postgresql/ sudo rm -r /opt/findface-multi/data/timescaledb/
Install the FindFace Multi 2.3 instance into the
/opt/findface-multidirectory.Restore Tarantool data from the backup.
Copy the
~/backup_data/ffmulti_dump/folder to thefindface-multi-findface-sf-api-1container.sudo docker cp ~/backup_data/ffmulti_dump/ findface-multi-findface-sf-api-1:/
Restore Tarantool data.
Note
If you are updating from FindFace Multi version with Guardant offline license implemented via USB dongle, first take an action to configure the
findface-ntlssection in the/opt/findface-multi/docker-compose.yamlfile. Take steps 2, 3 from the Offline Licensing via USB dongle instruction.
sudo docker exec -it findface-multi-findface-sf-api-1 bash -c 'cd ffmulti_dump && for x in *.json; do /storage-api-restore -config /etc/findface-sf-api.yml < "$x"; done;'
In the new configuration files, replace the
NTECH USERpassword with the one, used in FindFace Multi 2.2.1. The old password can be obtained from the~/backup_data/configs/postgresql/40-init.sqlbackup file. TheNTECH USERpassword should be replaced in the following configuration files:findface-multi-legacy.pyfindface-multi-line-crossing-analytics.yamlfindface-multi-identity-provider.pyfindface-multi-alerts.yamlfindface-multi-audit.pypgbouncer -> userlist.txtpostgresql -> 40-init.sql
In the new configuration file
/opt/findface-multi/configs/findface-multi-legacy/findface-multi-legacy.py, replace theSECRET_KEYvalue in theGENERAL SETTINGSsection and'VIDEO_DETECTOR_TOKEN'value in theFINDFACE SECURITY SETTINGSsection with the ones, used in FindFace Multi 2.2.1. The old parameter values can be obtained from the~/backup_data/configs/findface-multi-legacy/findface-multi-legacy.pybackup file.If you’ve changed the
/opt/findface-multi/configs/findface-extraction-api/findface-extraction-api.yamlconfiguration file in FindFace Multi 2.2.1, then compare the parameters you’ve changed with the parameters in the new/opt/findface-multi/configs/findface-extraction-api/findface-extraction-api.yamlconfiguration file of FindFace Multi 2.3 version and modify custom parameters.sudo vi /opt/findface-multi/configs/findface-extraction-api/findface-extraction-api.yaml
Important
Follow these rules to transfer parameters from the old configuration file to the new one:
If there is a new neural network model in the new configuration file, replace it with the previous one (considering that the previous model is still included in FindFace Multi 2.3), and if the previous model is missing in FindFace Multi 2.3, then do not change anything. In this case, you will have to do migration to a different neural network model.
If a parameter had an empty value in the old configuration file, but has a certain value in the new configuration file, delete its value in the new configuration file.
Keep as is those parameters that were not included in the old configuration file, but are present in the new configuration file.
Important
If you’ve changed configuration files
/opt/findface-multi/configs/findface-ntls/findface-ntls.yamland/opt/findface-multi/configs/findface-sf-api/findface-sf-api.yamlin FindFace Multi 2.2.1, then compare the parameters you’ve changed with the parameters in the new/opt/findface-multi/configs/findface-ntls/findface-ntls.yamland/opt/findface-multi/configs/findface-sf-api/findface-sf-api.yamlconfiguration files of FindFace Multi 2.3 version and modify custom parameters if necessary.sudo vi /opt/findface-multi/configs/findface-ntls/findface-ntls.yaml sudo vi /opt/findface-multi/configs/findface-sf-api/findface-sf-api.yaml
You may need to apply changes to the
docker-compose.yamlfile if you previously configured it to bring or exclude services or made any other changes.sudo vi /opt/findface-multi/docker-compose.yaml
From the
/opt/findface-multidirectory remove thefindface-multi-postgresql-1container anddata/postgresqldirectory and stop all FindFace Multi containers. If you have configured Alerts and BI Analytics, remove thefindface-multi-timescaledb-1container anddata/postgresqldirectory as well.cd /opt/findface-multi sudo docker rm -f -v findface-multi-postgresql-1 sudo docker rm -f -v findface-multi-timescaledb-1 sudo rm -rf data/timescaledb sudo rm -rf data/postgresql sudo docker-compose down
Restore data from backups.
Recreate postgresql and timescaledb containers.
sudo docker-compose up -d --force-recreate postgresql
sudo docker-compose up -d --force-recreate timescaledb
Open the
/opt/findface-multi/docker-compose.yamlfile and copy a{NEW_POSTGRES_PASSWORD}and{NEW_TIMESCALEDB_PASSWORD}values to use it in further step. Note that these passwords will differ from the previous one.grep postgresql\: docker-compose.yaml -A5 | grep POSTGRES_PASSWORD environment: {POSTGRESQL_ALLOW_REMOTE_CONNECTIONS: 'no', POSTGRES_PASSWORD: {NEW_POSTGRES_PASSWORD}}
grep timescaledb\: docker-compose.yaml -A5 | grep POSTGRES_PASSWORD
    environment: {PGPORT: 5433, POSTGRESQL_ALLOW_REMOTE_CONNECTIONS: 'yes', POSTGRES_PASSWORD: {NEW_TIMESCALEDB_PASSWORD}}
Restore data from backups. Paste the
{NEW_POSTGRES_PASSWORD}value to postgresql and{NEW_TIMESCALEDB_PASSWORD}to timescaledb you previously copied.sudo docker exec -i findface-multi-postgresql-1 bash -c "PGPASSWORD={NEW_POSTGRES_PASSWORD} psql --username postgres ffsecurity" < <(cat ~/backup_data/pg_bkp/legacy.sql) sudo docker exec -i findface-multi-postgresql-1 bash -c "PGPASSWORD={NEW_POSTGRES_PASSWORD} psql --username postgres ffsecurity_identity_provider" < <(cat ~/backup_data/pg_bkp/identity_provider.sql) sudo docker exec -i findface-multi-postgresql-1 /bin/bash -c "PGPASSWORD={NEW_POSTGRES_PASSWORD} psql --username postgres superset" < <(cat ~/backup_data/pg_bkp/superset.sql) sudo docker exec -i findface-multi-postgresql-1 /bin/bash -c "PGPASSWORD={NEW_POSTGRES_PASSWORD} psql --username postgres alerts" < <(cat ~/backup_data/pg_bkp/alerts.sql)
sudo docker exec -i findface-multi-timescaledb-1 /bin/bash -c "PGPASSWORD={NEW_TIMESCALEDB_PASSWORD} psql --username postgres annex" < <(cat ~/backup_data/tdb_bkp/annex.sql)
sudo docker exec -i findface-multi-timescaledb-1 /bin/bash -c "PGPASSWORD={NEW_TIMESCALEDB_PASSWORD} psql --username postgres analytics" < <(cat ~/backup_data/tdb_bkp/analytics.sql)
Start all FindFace Multi containers.
sudo docker-compose up -d
Note
You can additionally deploy Video Recorder. See Deploy Video Recorder Step-by-Step.