External VMS
FindFace Multi includes built‑in integration with external video management systems (VMS), allowing you to import VMS cameras into FindFace Multi for processing. Once a VMS camera has been added, it supports exactly the same actions as any native FindFace Multi camera.
Integration with External VMS is possible through a plug-in layer. Interaction between the plugin and FindFace Multi is performed via HTTP. The plugin interacts with the VMS, FindFace Multi interacts with the plugin.
In this section:
This is the step-by-step configuration guide for installing and configuring the External VMS feature in FindFace Multi. The user should have strong experience administering Linux OS and Docker containers.
Create a Service Account for VMS Integration Plugin
Create a user (username: ntech) with a specific set of permissions. This will be used as the service account for the integration plugin. To do so, execute the command below:
adduser --system --disabled-password --disabled-login --home /var/empty \
                --no-create-home --quiet --force-badname --group ntech
Configure FindFace Multi to Enable External VMS Integration Plugin
Open the
/opt/findface-multi/configs/findface-multi-legacy/findface-multi-legacy.pyfile and locate theExternal VMS Integration settingssection.Change the
'ENABLED'parameter toTrue.Write down the
TOKENvalue, as you will need it to configure the plugin later. The default value isPLUGIN_TOKEN. Please note that theVmsPluginTokentoken prefix should only be in thefindface-multi-legacy.pyconfiguration file. If the plugin is installed on the same host as FindFace Multi, use the container name and porthttp://findface-vms-integration-plugin:18333as the plugin address.... # -- External VMS integration settings -- # cleanup settings 'EXTERNAL_VMS_EVENTS_MAX_AGE': 0, 'EXTERNAL_VMS_SEND_EVENTS_STATUS_MAX_AGE': 0, 'EXTERNAL_VMS': { 'ENABLED': True, 'PLUGIN_ADDRESS': 'http://findface-vms-integration-plugin:18333', 'TOKEN': 'VmsPluginToken PLUGIN_TOKEN', 'EVENT_SENDER': { 'ENABLED': True, 'ALLOWED_TYPES': ['face'], 'SENDER_TASKS': 1, 'MAX_SEND_ATTEMPTS': 1, 'MIN_EVENT_SEND_TIMEOUT': 0.1, 'MAX_EVENT_SEND_TIMEOUT': 100, 'RESPONSE_TIMEOUT': 10, }, }, ...
Tip
In this example, the plugin is installed on the same host as FindFace Multi. If the plugin is installed on a separate host, specify the server’s address in the
PLUGIN_ADDRESSparameter.Note
If you need to send events to VMS, set the
'ENABLED'value toTruein theEVENT_SENDERsection.Restart all FindFace Multi containers.
cd /opt/findface-multi/

sudo docker-compose restart
Brief description of the parameters available below:
Parameter |
Description |
|---|---|
|
Time to store the events received from an external VMS system (days). 0 – unlimited. |
|
Time to store the events sent to an external VMS system (days). 0 – unlimited. |
|
The status of FindFace VMS Integration module. If enabled, the |
|
Plugin IP address. |
|
Token required for VMS Integration plugin to authenticate in Findface Multi (it must match the token in the plugin configuration file). |
|
If |
|
Object types to send |
|
The number of simultaneous tasks to send events to the plugin. Default value = 1. If necessary, it can be increased. Please consult NtechLab Support Team (support@ntechlab.com). |
|
The number of attempts to send before it is considered unsuccessful. |
|
The time between sending attempts, if a failed sending occurs. It will grow
exponentially from minimum to maximum as long as the number of attempts
|
|
Time to wait for a response from the plugin when sending an event. |
Create New Database in PostgreSQL
Open the file
/opt/findface-multi/docker-compose.yamland write down thePOSTGRES_PASSWORDvalue. You will need it for the next step.sudo vi /opt/findface-multi/docker-compose.yaml ... postgresql: environment: {POSTGRES_PASSWORD: POSTGRES_PASSWORD} ...
Enter the
findface-multi-postgresql-1container via executing the following command:sudo docker exec -i findface-multi-postgresql-1 /bin/bash -c "PGPASSWORD={POSTGRES_PASSWORD} psql --username postgres"
To ensure you’ve successfully shelled into a container, use the
\lcommand to view the list of databases:List of databases Name | Owner | Encoding | Locale Provider | Collate | Ctype | ICU Locale | ICU Rules | Access privileges ------------------------------+----------+----------+-----------------+-------------+-------------+------------+-----------+----------------------- alerts | ntech | UTF8 | libc | C.UTF-8 | C.UTF-8 | | | ffsecurity | ntech | UTF8 | libc | C.UTF-8 | C.UTF-8 | | | ffsecurity_audit | ntech | UTF8 | libc | C.UTF-8 | C.UTF-8 | | | ffsecurity_identity_provider | ntech | UTF8 | libc | C.UTF-8 | C.UTF-8 | | | postgres | postgres | UTF8 | libc | en_US.UTF-8 | en_US.UTF-8 | | | replication_receiver | ntech | UTF8 | libc | C.UTF-8 | C.UTF-8 | | | replication_sender | ntech | UTF8 | libc | C.UTF-8 | C.UTF-8 | | | superset | superset | UTF8 | libc | C.UTF-8 | C.UTF-8 | | | template0 | postgres | UTF8 | libc | en_US.UTF-8 | en_US.UTF-8 | | | =c/postgres + | | | | | | | | postgres=CTc/postgres template1 | postgres | UTF8 | libc | en_US.UTF-8 | en_US.UTF-8 | | | =c/postgres + | | | | | | | | postgres=CTc/postgres (10 rows)
Run the following command to create the new database required for external VMS functionality:
CREATE DATABASE ffsintegration WITH OWNER ntech ;
Validate the database creation via executing
\lagain. Once completed, use\qparameter to exit PostgreSQL.CREATE DATABASE ffsintegration WITH OWNER ntech ; CREATE DATABASE \l List of databases Name | Owner | Encoding | Locale Provider | Collate | Ctype | ICU Locale | ICU Rules | Access privileges ------------------------------+----------+----------+-----------------+-------------+-------------+------------+-----------+----------------------- alerts | ntech | UTF8 | libc | C.UTF-8 | C.UTF-8 | | | ffsecurity | ntech | UTF8 | libc | C.UTF-8 | C.UTF-8 | | | ffsecurity_audit | ntech | UTF8 | libc | C.UTF-8 | C.UTF-8 | | | ffsecurity_identity_provider | ntech | UTF8 | libc | C.UTF-8 | C.UTF-8 | | | ffsintegration | ntech | UTF8 | libc | en_US.UTF-8 | en_US.UTF-8 | | | postgres | postgres | UTF8 | libc | en_US.UTF-8 | en_US.UTF-8 | | | replication_receiver | ntech | UTF8 | libc | C.UTF-8 | C.UTF-8 | | | replication_sender | ntech | UTF8 | libc | C.UTF-8 | C.UTF-8 | | | superset | superset | UTF8 | libc | C.UTF-8 | C.UTF-8 | | | template0 | postgres | UTF8 | libc | en_US.UTF-8 | en_US.UTF-8 | | | =c/postgres + | | | | | | | | postgres=CTc/postgres template1 | postgres | UTF8 | libc | en_US.UTF-8 | en_US.UTF-8 | | | =c/postgres + | | | | | | | | postgres=CTc/postgres (11 rows) \q
Install and Configure FindFace VMS Integration Plugin
Open the
/opt/findface-multi/configs/findface-multi-legacy/findface-multi-legacy.pyfile and locate theDATABASESsection. Write down thePASSWORDvalue for userntech:sudo vi /opt/findface-multi/configs/findface-multi-legacy/findface-multi-legacy.py ... # Database is used to store cameras, camera groups, watchlists and so on. # Only PostgreSQL is supported. DATABASES = { 'default': { 'ENGINE': 'django.db.backends.postgresql', 'DISABLE_SERVER_SIDE_CURSORS': True, 'NAME': 'ffsecurity', 'HOST': 'pgbouncer', 'PORT': 6432, 'USER': 'ntech', 'PASSWORD': 'PASSWORD' } }
Request the plugin
findface-vms-integration-plugin.imgfrom an NtechLab representative.Load the plugin into the system.
docker load < findface-vms-integration-plugin.img
Configure the
/opt/findface-multi/docker-compose.yamlfile to add thefindface-vms-integration-pluginsection.sudo vi /opt/findface-multi/docker-compose.yaml
Add the
findface-vms-integration-pluginsection to the end of the/opt/findface-multi/docker-compose.yamlfile.findface-vms-integration-plugin: depends_on: [findface-ntls, postgresql, findface-multi-legacy] image: findface-vms-integration-plugin:latest networks: [product-network] volumes: ['./configs/findface-vms-integration-plugin/findface-vms-integration-plugin.conf:/etc/findface-vms-integration-plugin.conf'] restart: always
Tip
The plugin version might differ from that listed in this documentation. For the latest version, contact technical support by support@ntechlab.com.
Create the configuration file for the plugin.
sudo mkdir configs/findface-vms-integration-plugin/
sudo vi configs/findface-vms-integration-plugin/findface-vms-integration-plugin.conf
There is an example of the
findface-vms-integration-plugin.confconfiguration file below.# URL prefix for API version 1 endpoints # Default: /api/v1 # API_V1_STR: /v1 # App listens on this interface. Set it to 0.0.0.0 to listen on all available interfaces # Default: 127.0.0.1 # HOST: 0.0.0.0 # App accepts HTTP connections on this port # Default: 18333 # # PORT: 18333 # Public URL for App #Default: http://127.0.0.1:18333 # #PUBLIC_URL: http://127.0.0.1:18333 # Public URL for FFS # Default: http://127.0.0.1 # FFS_PUBLIC_URL: http://172.23.218.85 # Replace 172.23.218.85 with your FindFace Multi IP address. # Full database URL dialect+driver://username:password@host:port/database. # Alternatively, connection parameters can be specified one by one (see below). # # SQLALCHEMY_DATABASE_URI: # Database host # POSTGRES_SERVER: postgresql # name of the postgresql container # Database port number # POSTGRES_PORT: 5432 # Database user # POSTGRES_USER: ntech # Database user password # POSTGRES_PASSWORD: POSTGRES_PASSWORD # the PostgreSQL password for the ``ntech`` user from the ``/opt/findface-multi/configs/findface-multi-legacy/findface-multi-legacy.py`` configuration file # Database name # POSTGRES_DB: ffsintegration # Log SQL statements # Default: FALSE # # LOG_QUERIES: FALSE # Secret token used to validate requests made by FindFace Security # Required: yes # FFS_TOKEN: PLUGIN_TOKEN # Include traceback information in error responses # Default: FALSE # RESP_TRACEBACK: True # Logging level # Default: INFO # #LOG_LEVEL: DEBUG # Enable journald log handler. # Default: TRUE # # LOG_TO_JOURNALD: TRUE # Timeout for requests to VMS # Default: 10 # # VMS_REQUEST_TIMEOUT_SEC: 10 # Timeout for requests to FindFace # Default: 10 # # FF_REQUEST_TIMEOUT_SEC: 10
Tip
In this example, the plugin is installed on the same host as FindFace Multi. If the plugin is installed on a separate host, specify the FindFace Multi server’s address in the
POSTGRES_SERVERparameter and the FindFace Multi URL in theFFS_PUBLIC_URLparameter.If you installed the plugin on the FindFace Multi host, you only need to configure the login and password to the local PostgreSQL database.
POSTGRES_USER: ntech
POSTGRES_PASSWORD: POSTGRES_PASSWORD
The
POSTGRES_PASSWORDvalue can be obtained from the/opt/findface-multi/configs/findface-multi-legacy/findface-multi-legacy.pyfile.To enable the external VMS plugin in FindFace Multi start all FindFace Multi containers from the
/opt/findface-multidirectory.sudo docker-compose up -d
Open FindFace Multi in a web browser. You will see the Settings → External VMS section.
Warning
It is necessary to set the same time zone on the external VMS server as on the FindFace Multi server for correct playback of video archives from the external VMS.
Add External VMS in FindFace Multi
In the Settings → External VMS section, click on the + New VMS button.
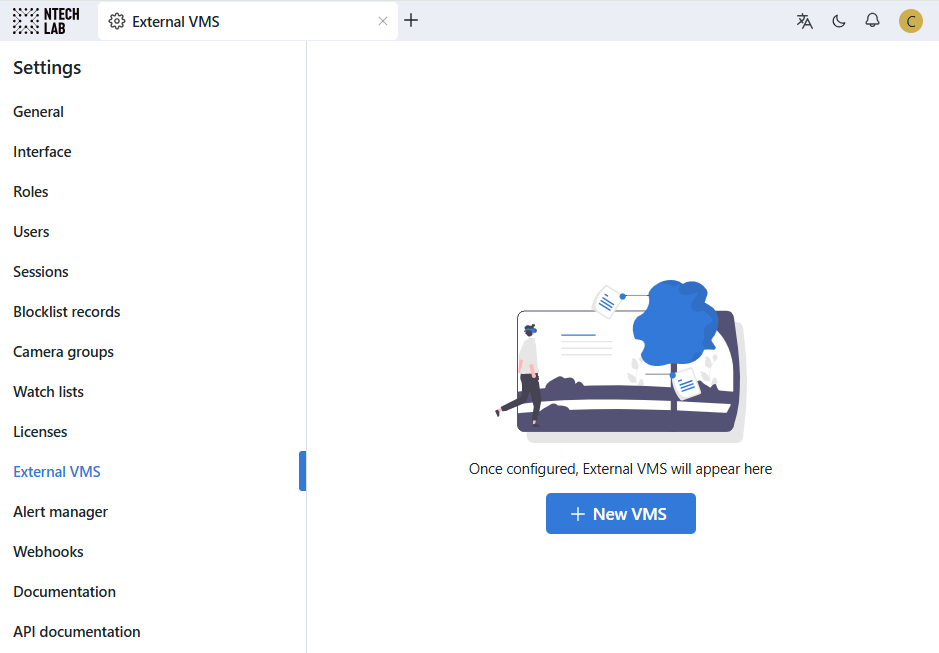
Specify your VMS parameters in the opened windows and click on the Save button once ready:

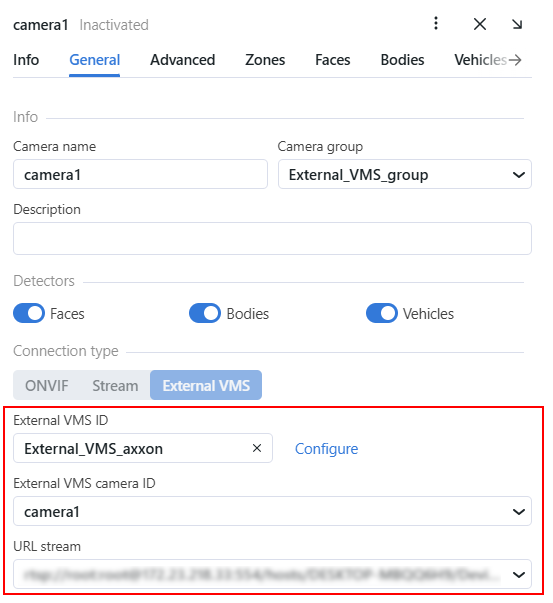
Once completed, you can manage the streams from your VMS on the Cameras tab. For instance, you may add all or selected cameras in FindFace Multi instantly.

If you need to send events to an external VMS, check the camera settings imported from the VMS to ensure they are configured to forward the events to the external VMS:
When you click the
 button on the processing configuration wizard for a created camera, the following actions are available:
Filer events
Activate/Deactivate
Delete
Restart
Reset to default
Duplicate
In the required watch list properties, activate the checkbox
Send mapping events to VMSand click on Save button to apply the changes.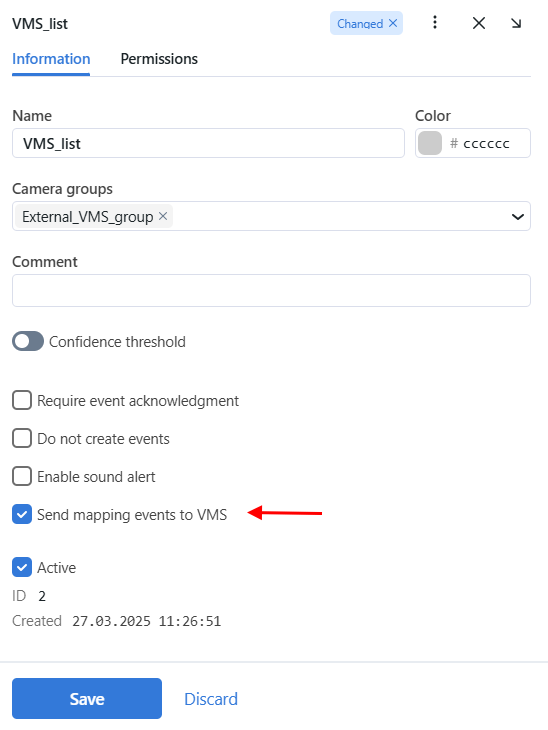
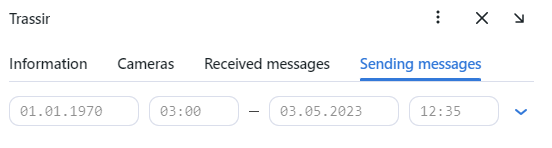
Sent and received messages can be viewed in the corresponding tabs of the target VMS:
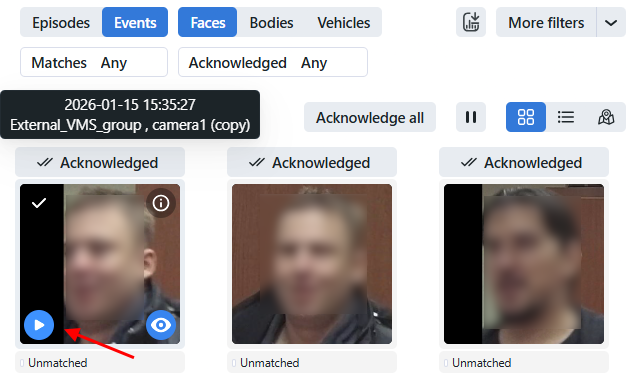
If a Video Recorder is deployed and configured, you can play the video archives of the external VMS (Axxon, Trassir) through it. To use this functionality, first check the camera added from VMS is active. Then navigate to the Episodes & Events tab and hover over the event or episode of your interest. The play button will display on the thumbnail of the object (face/body or vehicle). Press it to start playing the video from the time when the event/episode was recorded from the camera.
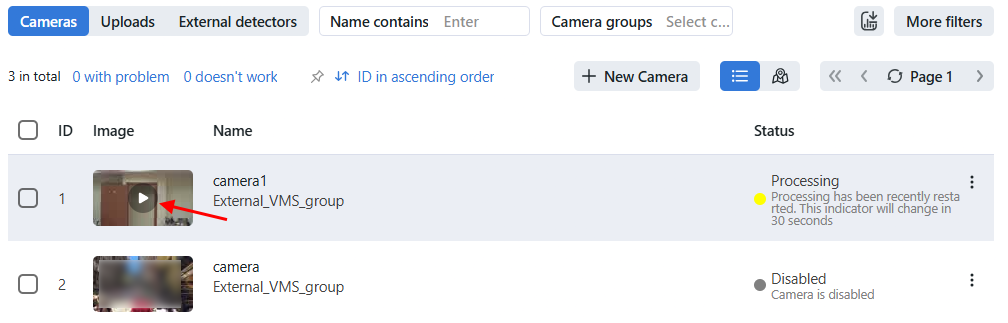
You can also play the video archive through the camera by clicking play on the camera thumbnail in the camera list on the Video Sources tab. As a result, the video from the external VMS camera will be displayed in the Video Recorder. If there is a recorded video archive in FindFace Multi at the specified time, then it will be played in the Video Recorder instead of the video from an external VMS.
Now, your FindFace Multi installation is enhanced by external VMS support. You may connect as many VMS systems as required and add existing video streams in FindFace seamlessly within just a few clicks.