Set Up Object Monitoring and Card Index
FindFace Multi provides video monitoring of the following objects:
human face
human body (silhouette)
car/vehicle
Object monitoring is implemented using a set of default and custom watch lists, e.g., wanted, VIP, etc., and a card index. You can create as many custom watch lists as necessary.
The card index contains two types of cards:
person card: aggregates data about a person, such as photos of their face and body, their name, and associated files.
car card: contains car-related data, such as car photos and license plate number information.
Each card is allocated to one or several watch lists. To put a person/car on video monitoring, you need to make a relevant watch list active.
To create cards in bulk, use the batch photo upload functionality.
In this section:
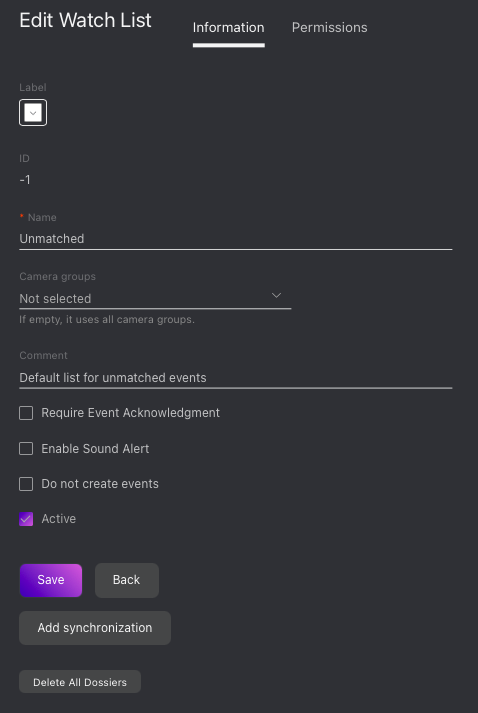
Monitoring Unmatched Objects
FindFace Multi features a special pre-configured watch list used for monitoring only unmatched objects (objects that do not match any card). This watch list cannot be removed from the system. To edit its settings, navigate to the Preferences tab. Click Watch Lists and then click Unmatched in the table.
Create Watch List
You can create a custom watch list. Do the following:
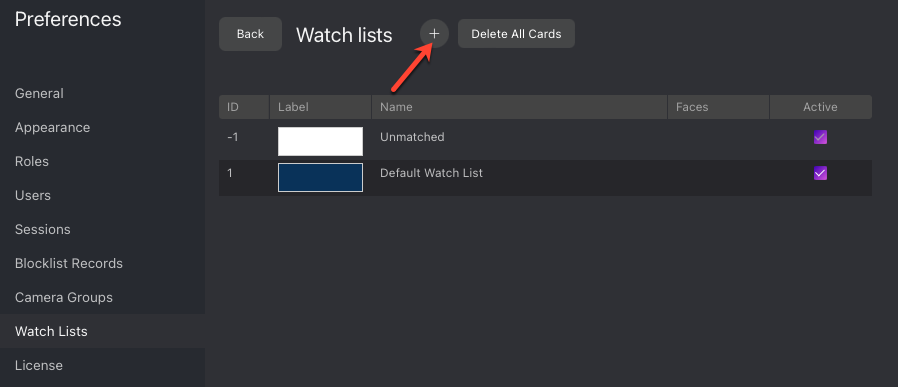
Navigate to the Preferences tab. Click Watch Lists.
Click +.
From the Label palette, select a color which will be shown in event notifications for this list. Keep in mind that the right color makes for a quicker response of the person on duty.
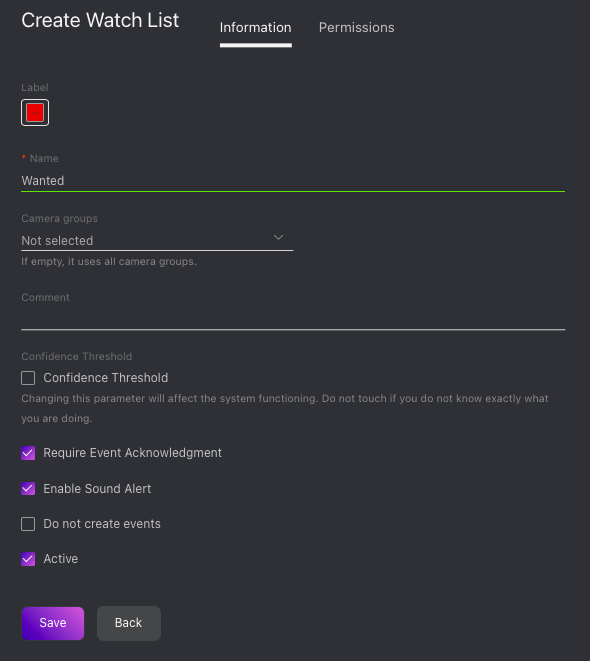
Specify the watch list name. Add a comment if needed.
Select a camera group(s) that will be used to monitor the watch list. If no groups specified, the watch list will be monitored by all active cameras in the system.
Check Require acknowledgment if it is mandatory that events associated with the list be manually acknowledged.
Check Enable sound alert to turn on sound notifications for the list if needed.
By default, all watch lists in the system are applied the generic confidence threshold. To set an individual threshold for the watch list, check Confidence Threshold and specify the threshold value.
Important
The default generic confidence threshold is optimal for the majority of recognition cases. We do not recommend changing it on your own. Be sure to consult with our technical experts prior (support@ntechlab.com).
Check Active.
Click Save.
On the Permissions tab, assign privileges on the watch list, specifying which user roles are allowed to change/view the watch list settings.
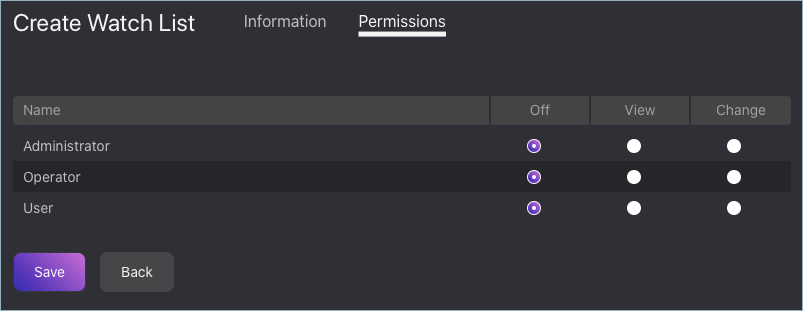
Click Save.
Create Person Card
To create a person card manually, do the following:
Important
To be able to attach body images to a person card, you must enable the body detection functionality.
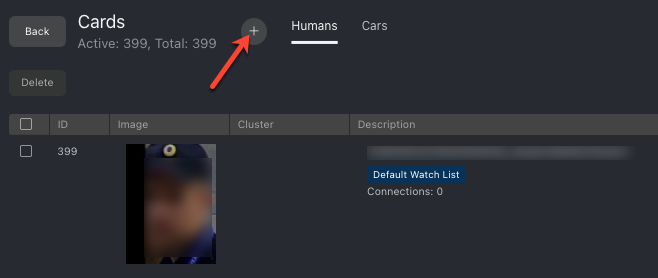
Navigate to the Cards tab.
Click Humans.
Click +.
Attach images of the person’s face/body. Supported formats: WEBP, JPG, BMP, PNG.
Important
A face/body in the images must be close to a frontal position. Distance between pupils in the face image: 60 px. Images that do not meet the requirements will be rejected with a detailed error description.

Attach related files.
Specify the card name. If necessary, add a comment.
From the Watch lists drop-down menu, select a watch list for the card (or several watch lists, one by one).
Check Active. If a card is inactive, it is excluded from the monitoring.
Click Save.
Note
If a similar card already exists in the card index, you will be given the following options:
add objects from the new card to the already existing one and cancel the new card creation
create the new card anyway
cancel creation
Create Car Card
Important
For car cards to be available for creation, you must enable the car detection functionality.
To create a car card manually, do the following:
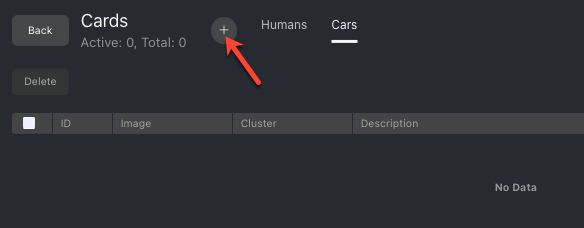
Navigate to the Cards tab.
Click Cars.
Click +.
Attach the car images. Supported formats: WEBP, JPG, BMP, PNG.
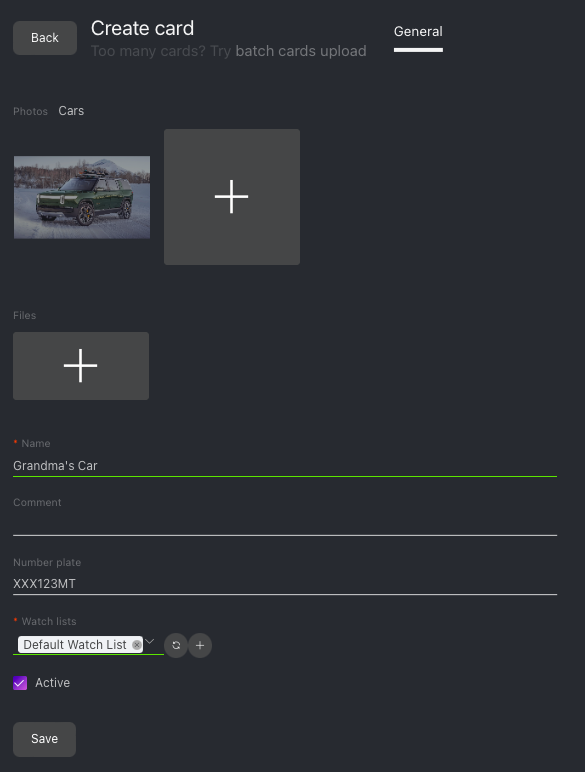
Attach related files.
Specify the card name. If necessary, add a comment.
Specify the car’s license plate number if applicable.
From the Watch lists drop-down menu, select a watch list for the card (or several lists, one by one) .
Check Active. If a card is inactive, it is excluded from the monitoring.
Click Save.
Note
If a similar card already exists in the card index, you will be given the following options:
add objects from the new card to the already existing one and cancel the new card creation
create the new card anyway
cancel creation
View Matched Clusters
Important
To be able to view matched clusters, you must enable clustering of relevant object types.
In the course of operation, the system may supplement cards with matched clusters.
To view a cluster matched with an exact person or car, open the corresponding card and navigate to the Cluster images tab.
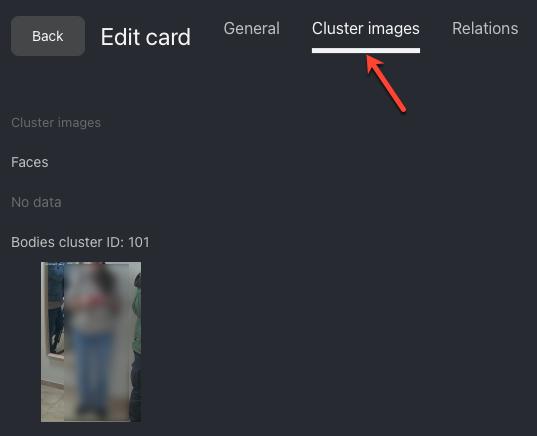
In a person card, you will see a matched face cluster and a body cluster. A relevant car cluster will be shown in a car card.
Card Relations
You can set up relations between cards by creating a common category they belong. For example, the Household category can include all family members and their vehicles.
A card can be related to as many categories as needed.
To set up a card-to-category relation, do the following:
Open the card for editing by clicking it on the list. Navigate to the Connections tab.
Click Create connection.
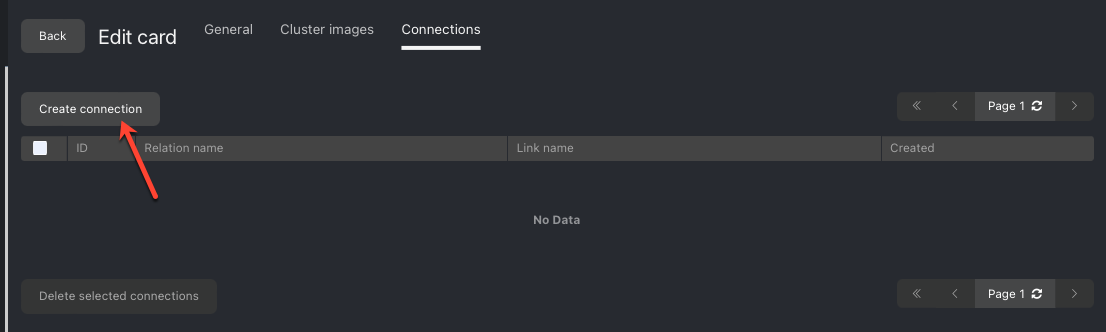
In the Relation name field, specify the category name. If there are already existing matching categories in the system, you will be able to see them and select one of them shortly after you start typing the name.
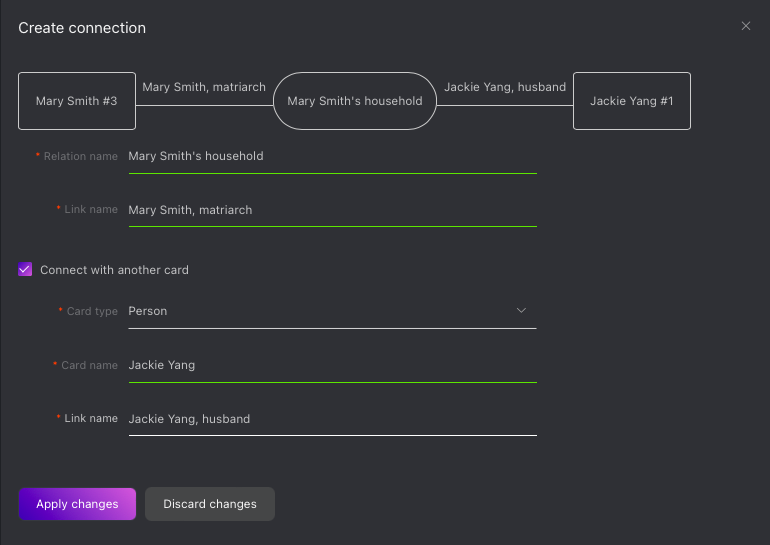
In the Link name field, describe the link between the card and the category.
If there is another card related to the same category, you can promptly add it right here. Do the following:
Check Connect with another card.
Select the card type: Person or Car.
Start typing the card name in the same-name field. As a result, the system will automatically suggest cards with relevant names. Select one of them.
In the Link name field, describe the link between the card and the category.
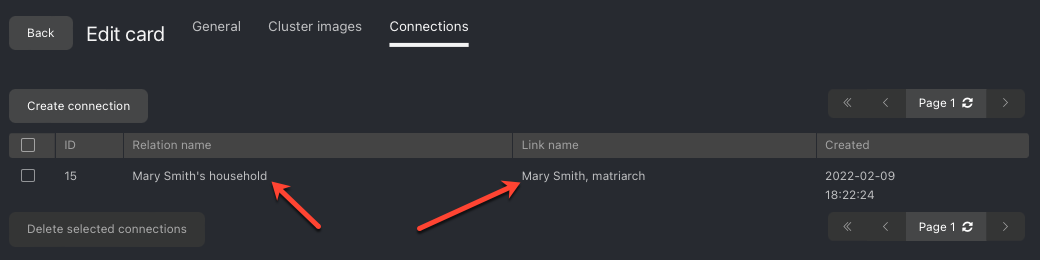
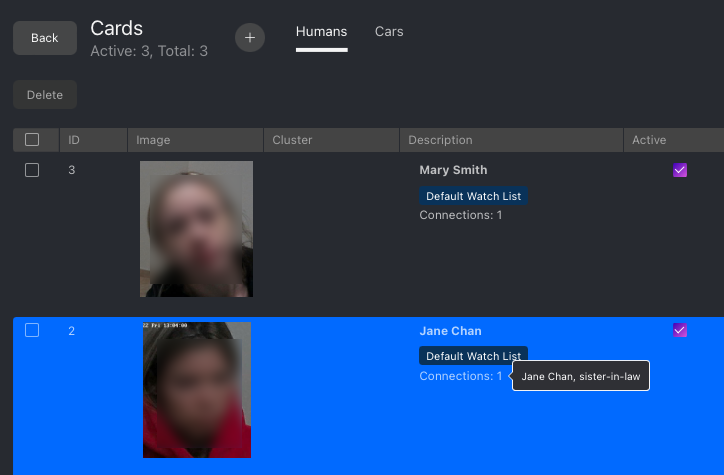
Click Save. The created links will be shown on the Connections tab and on the card list.
Note
If there are several cards related to the same category, repeat this step-by-step instruction with all the cards involved.
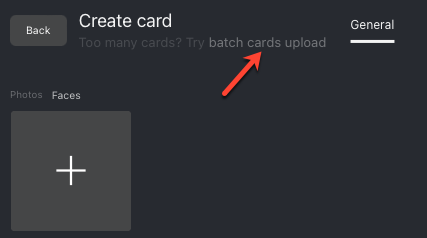
Batch Card Upload
To create cards in bulk, use the batch card upload. Do the following:
Tip
If the number of photos you need to upload exceeds 10,000, use the console bulk upload. In the current version, it does not support cars and bodies, only faces.
Important
Supported formats: WEBP, JPG, BMP, PNG.
Important
A face/body in the images must be close to a frontal position. Distance between pupils in face images: 60 px. Images that do not meet the requirements will be rejected with a detailed error description.
Navigate to the Cards tab.
Click Humans or Cars, subject to the card type being uploaded.
Click +.
Click Try batch card upload.
For person cards, specify the objects to detect: faces or bodies.
Select multiple image files, or a directory.
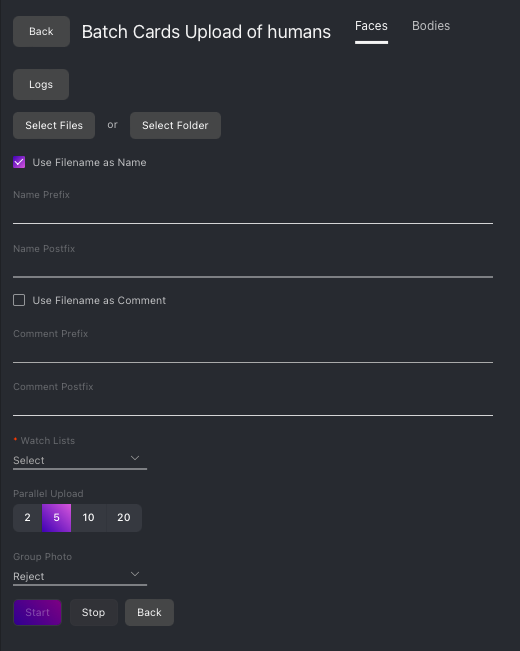
You can use image file names as a basis for names and/or comments in cards to be created. Select the necessary option(s). Then configure the automatic name/comment generation rule by appending a custom prefix and/or postfix to the file name.
Tip
To avoid merging the 3 words into one, use underscore or another symbol in the prefix and postfix.
From the Watch lists drop-down menu, select a classification list for the cards.
Use the Parallel Upload option to specify the number of photo upload streams. The more streams you use, the faster it takes to complete the upload, however it requires more resources as well.
From the Group Photo drop-down menu, select the system behavior upon detecting several objects in a photo: reject the photo, upload the biggest object, or upload all objects.
Click Start to launch the photo upload.
Important
To view the batch photo upload log, click Logs. You can then download the log in the
.csvformat if needed.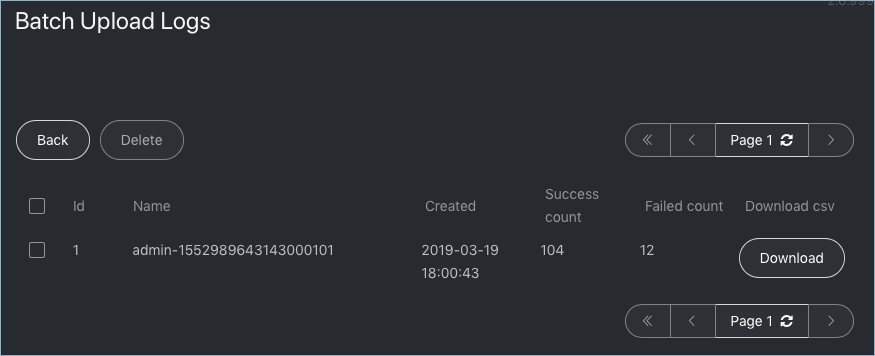
Filter Cards
You can find all cards created in FindFace Multi on the Cards tab. Use the following filters to filter them out:
On the Humans tab (people cards):
Card name: filter cards by name.
Watch lists: display cards included into selected watch lists.
Faces: filter cards by presence of a face image in a card attachment.
Bodies: filter cards by presence of a body image in a card attachment.
Filled: display cards subject to whether they are auto-generated (not filled) or completed (filled) cards. See Auto-Generated and Completed Cards for a detailed explanation.
ID: display a card with a given ID.
On the Cars tab (car cards):
Card name: filter cards by name.
License plate: filter cards by license plate number.
Watch lists: display cards included into selected watch lists.
Cars: filter cards by presence of a car image in a card attachment.
Filled: display cards subject to whether they are auto-generated (not filled) or completed (filled) cards.
ID: display a card with a given ID.
You can sort out cards in the list by ID.

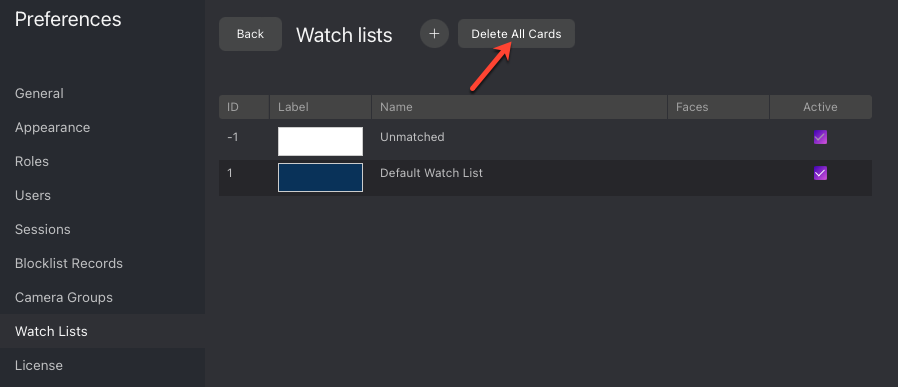
Purge Card Index
You can purge the entire card index in one click. To do so, navigate to the Preferences tab. Click Watch Lists. Click Delete All Cards.
Disable Event Creation for Specific Objects
Sometimes, it is necessary to omit certain objects during monitoring. One of the most common cases is the objects in advertisement media located in the camera field. Being detected continuously by your system, they can easily overflow the event feed and the database.
To prevent this from happening, do the following:
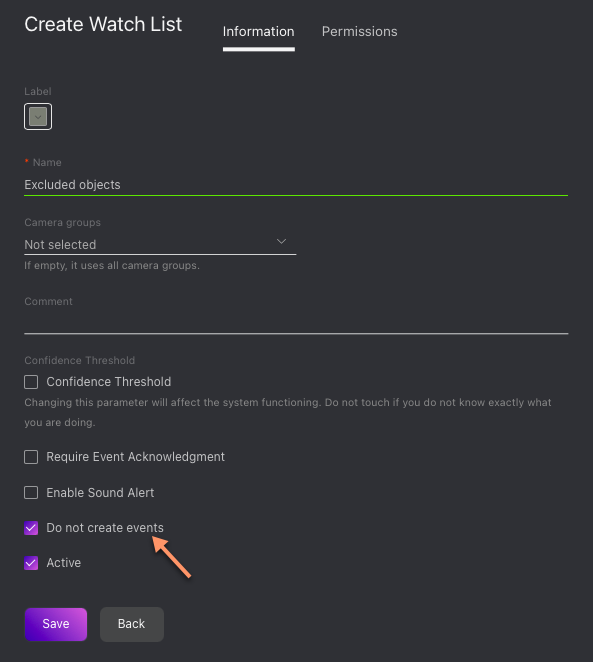
Create a watch list that will store the objects excluded from detection. In its settings, check Do not create events.
For each excluded object, create a card and add it to the watch list.
Auto-Generated and Completed Cards
Subject to the way a card is created, there are auto-generated (“auto”) cards and completed cards.
Auto cards
Auto cards are created automatically by the system for clusters that have no matches in the card index.
Note
By default, the creation of auto cards is disabled. To enable it, set 'CREATE_AUTO_CARDS': True at /etc/findface-security/config.py and restart findface-security.
sudo vi /etc/findface-security/config.py

# create auto cards for unmatched clusters
'CREATE_AUTO_CARDS': True,
sudo systemctl restart findface-security.service
There are no uploaded images on the General tab in the auto cards, so such cards are also called blank.
The following filters do not apply to the blank cards:
Faces -> Only with faces
Bodies -> Only with bodies
Cars -> Only with cars
Completed cards
Unlike auto cards, completed cards have uploaded images of a person’s face and body or a car image.
To separate auto cards and completed cards in the card index, use the Filled filter.
To turn an auto card into a completed card, upload the same object’s image to it and modify the card name.